How to enhance your Shiny apps with JavaScript (JS) without knowing much JS
Shiny
JavaScript
Every now and then I need JavaScript to enhance my Shiny apps. But I don’t actually know much about JS. In this blog post, I show you how I still make JS stuff work.
Author
Albert Rapp
Published
December 1, 2022
I do not know much about JavaScript (JS). But what I do know is that JS can seriously spice up your Shiny apps. After all, JS is one of the three key programming languages of the internet.
So if there’s something you cannot do with {shiny} (or extensions), then you can make it work directly with JS. And the good news is that the first steps are not that hard.
I know that because I can barely use JS but. But every now and then I need it to enhance my apps. In this blog post, I show you how I make that work. Despite my lack of an in-depth understanding of JS.
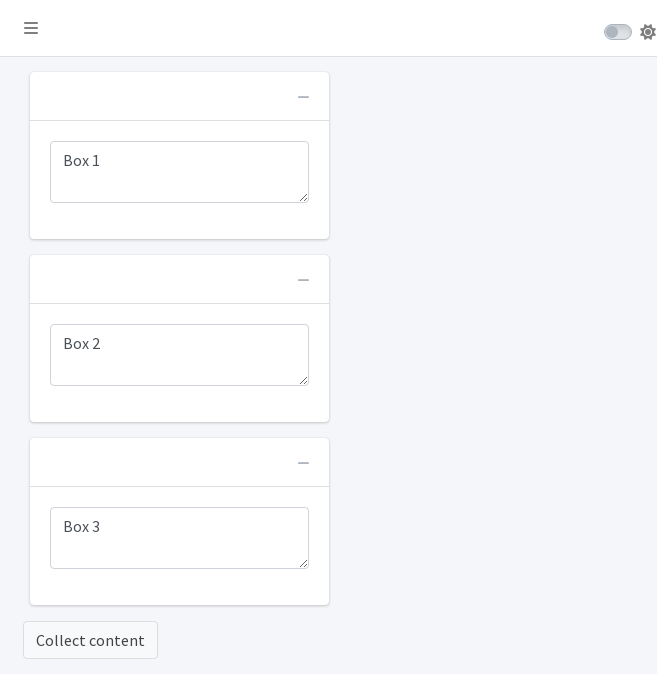
The easiest way to do that is through an example. Here’s a minimal dashboard that we’re going to enhance. It’s built with {shiny} and {bs4Dash}.
As you can see, this app consists of three boxes that each have a text input. Due to sortable() we can rearrange these boxes interactively. This means we could drag-and-drop Box 3 above Box 1. You can try that yourself in the live app.
Did you notice the button at the bottom of the page? It is designed to get the texts from the boxes in the current order (after having rearranged them interactively). Thus, we can’t simply call the inputs input$box_1, input$box_2 and input$box_3 like we normally would. This would only work if the boxes are in their default order. This is where JS will help us.
Play around with your web browser’s console
Now that we have an app, it’s time to explore it’s web code. This means we run this app, open it in our web browser and then open the developer mode. This can be done by right-clicking anywhere and then clicking “Inspect”.
This let’s us inspect all elements of our app. Inspecting one of the boxes shows us that all boxes use the <textarea> tag. Thus, we can find our texts by using JS to find all elements with that specific tag.
A quick web-search yields that a specific HTML tag can be found with
document.getElementsByTagName("<insert tag name>");
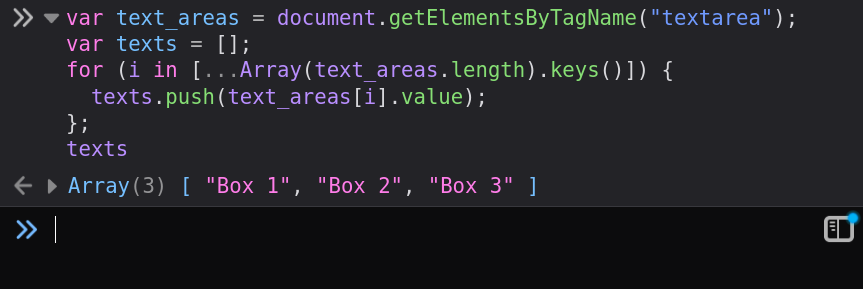
Now the question becomes where to put this code. Notice that the developer mode in your web browser has a “Console” tab (ctrl + shift + K in Firefox). That sounds like something that knows how to handle JS code. And it can. Sending
document.getElementsByTagName("textarea");
to your browser’s console will return what seems to be called an HTML collection.
The output is quite weird. At least for someone like me who is not used to JS. The collection has length three - that’s what it says - but it displays six different elements.
Turns out, you have two ways to extract a specific element (name and index) which are both displayed. That’s not so different from R. In fact, the syntax to access elements is pretty analogous to R. Here’s how it looks in JS. Watch out for zero-indexing though.
Notice that the HTML collection that we get is always in the correct order. Just try shuffling the boxes and then reexecute the JS command. It will show you the boxes in the order that is currently displayed in the app. That’s exactly what we need.
Variable declaration and looping
Alright, we know how to extract an HTML collection. Time to save it into a variable so that we can reuse it. You can declare a new variable with var as in
var text_areas =document.getElementsByTagName("textarea");
If you type this into your console, you will notice that it returns undefined. Don’t be alarmed by this. This just means that the last command did not return anything. It does not mean that it didn’t do anything. You can now type text_areas into your console and it will display your precious HTML collection.
Loop with for()
Next, we need to extract the actual texts from the HTML collection. We can get the texts from one HTML element via its value property which we access using the . notation. This might look like so
text_areas[0].value
Executing this will show you whatever text you’ve written in the first box. Of course, we want to extract all texts. Thus, we need to access all value properties of all elements in our HTML collection. We can do that with a for-loop. Here’s how a similar task could look in R.
new_array <-c()for (i inseq_along(old_array)) { new_array[i] <- old_array[i]}
Turns out, JS can use the exact same syntax to create for-loops. We just need to figure out how to replicate seq_along() in JS. This works with a somewhat strange syntax. We can create an array (think vector) [0, 1, 2] with
[...Array(text_areas.length).keys()]
Of course, when we would use more text boxes, we would have more entries in our array. Also, an empty array is created with []. Thus, we know that we will have to write something like
var texts = [];for (i in [...Array(text_areas.length).keys()]) {// instructions in here};
Finally, we can append an element to an array using an array’s internal push() function. Same as with the value property, a . lets us access an object’s internal functions.
var texts = [];for (i in [...Array(text_areas.length).keys()]) { texts.push(text_areas[i].value);};
After this code finished you will see that the output is 3. Nevermind that. It’s just the output from the last push() call (which returns the length of the new array after appending). Calling texts will show you that the texts are saved in our array.
Loop with functional programming
Before we move on, let me show you another way to extract the texts from all boxes without a for-loop. If you like, map() from {purrr}, then you’re going to love this. In R, we could use map() to iteratively do any task. For example, we could compute the cumulative sum of a vector like so.
Notice that there is an additional last line. This one is important. It will take the texts JS variable and make the content available in R under the name input$texts.
Also, I’ve named the function shinyjs.collect_content() because I want to use it in conjunction with the shinyjs package. But it’s also possible to include JS code without using {shinyjs}. I’ll show you that too.
Observe the texts input
Our JS function will make the content of the text boxes available under the name input$texts. So let us tie an observer to that variable in our server() function. For example, we can print the content to the console when it becomes available in R. This way, we know that our function worked. Here’s our new server() function:
server <-function(input, output, session) { collected_texts <-reactive({input$texts})observe({print(collected_texts()) }) |>bindEvent(collected_texts())}
Include JS code via text variables
The easiest way to use a JS function with {shinyjs} is to follow these three steps:
Load {shinyjs} and include your JS function as a text variable in your app’s R script:
Enable {shinyjs} by placing useShinyjs() somewhere in your UI.
Register your JS function with {shinyjs} by placing extendShinyjs(text = jsCode, functions = 'collect_content') somewhere in your UI.
Notice that the last step will only work, if the name of your JS function uses shinyjs. as a prefix. Also, the functions argument is used to describe the names that your JS function will have within R. I suggest that you use the same name but without the shinyjs. prefix.
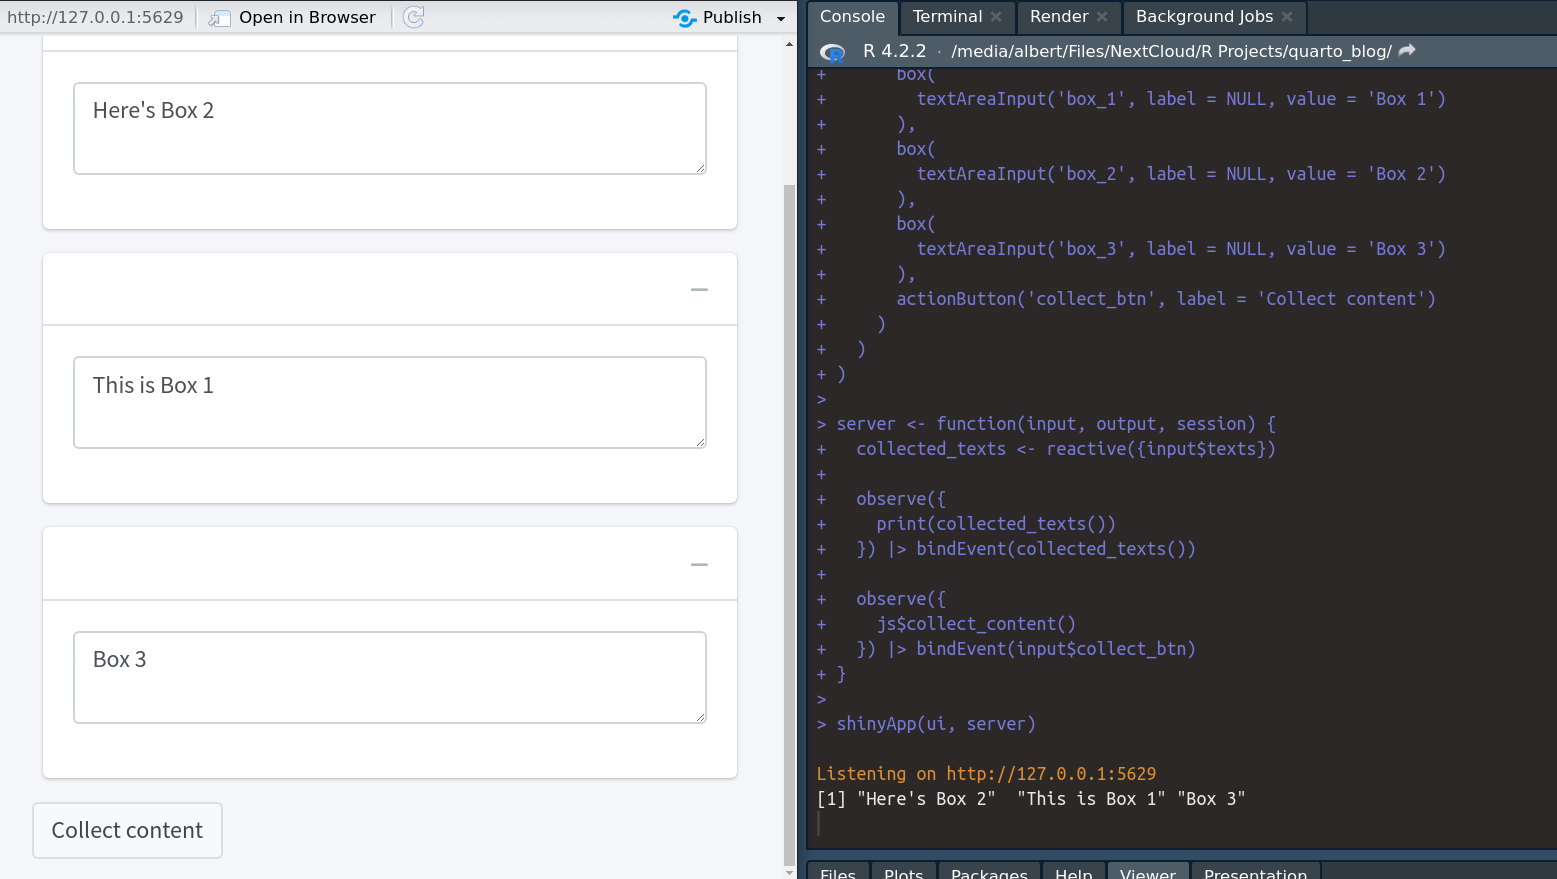
In case you need a quick recap, here’s the full code of our current app:
Finally, the last ingredient is to tie our JS function to a button click. Luckily, that’s really simple. You can instruct your app to run a JS function that has been registered with {shinyjs} by calling js$fct_name().
Thus, let us execute collect_content() whenever our button is clicked. This works by extending our server function a little bit.
This finshes our app. Check it out. I can now rearrange the boxes and when I click the button, the console will display the texts in the correct order.
Reading JS code from a file
Clearly, adding JS code by text variables clutters your app quite fast. So instead, try moving your JS code to a separate file. For example, I’ve saved the exact same code from before in a file collect_content.js (just create a text file and rename it so that it has .js file extension).
Now, I can just point the script argument of extendShinyjs() to collect_content.js. But here’s where you have to watch out: Your .js-files need to be stored in a directory called www. I know, this confused me as well. We write
This way, you can also define multiple JS functions in one file and load them all at once. In that case, you will have to use a vector for the functions argument of extendShinyjs().
Incorporate JS without {shinyjs}
Alright, we already accomplished what we said we would do. But I promised you a way to do the same even without {shinyjs}. Here’s what you need for that.
Set the onclick attribute of your button. This is HTML speak for “Define what JS code is executed when the button is clicked”. Here, we would just pass onclick = "collect_content();" to our function actionButton() in the UI.
Sneak the JS code for collect_content() into your app. This works by placing tags$script(<code as HTML here>) into the UI. Note that the function’s name will not contain the shinyjs. prefix anymore. This prefix works only with {shinyjs}.
Here’s what the new code could look like:
Shiny App
library(shiny)library(bs4Dash)### WRAP TEXT IN HTML() CALL FOR PROPER PARSINGjsCode <-HTML("collect_content = function() {var text_areas = document.getElementsByTagName('textarea');var texts = [...Array(text_areas.length).keys()].map(x => text_areas[x].value);Shiny.setInputValue('texts', texts)}")ui <-dashboardPage(header =dashboardHeader(),sidebar =dashboardSidebar(),body =dashboardBody(####### REPLACE SHINYJS STUFF WITH tags$script() tags$script(jsCode),#######sortable(box(textAreaInput('box_1', label =NULL, value ='Box 1') ),box(textAreaInput('box_2', label =NULL, value ='Box 2') ),box(textAreaInput('box_3', label =NULL, value ='Box 3') ),actionButton('collect_btn', label ='Collect content',onclick ='collect_content();' ) ) ))server <-function(input, output, session) { collected_texts <-reactive({input$texts})observe({print(collected_texts()) }) |>bindEvent(collected_texts())}shinyApp(ui, server)
There’s a couple of things about this app worth noting:
The JS code needs to be wrapped in HTML(). Of course, we can also save the code in a file and read it like read_lines('file.js') |> HTML().
Notice that we do not need an observer for the the button click in the server() function anymore. This part is now handled manually by the button’s integrated JS code.
Conclusion
Alright, this concludes our little JavaScript tour. As always, programming contains a lot of trying out new things. And with your web browser’s console you’ve got a tool to do just that.
Clearly, you’re not a JS master after this. But you’ve got your foot in the door. All of the JS functions that you’ve seen in this blog post were found through a quick web search and a bit of trial-and-error on the console.
Do not underestimate how much you can get done with this. After all, you don’t need to write a full app with JS. You only need to sprinkle in small parts that are not readily available with {shiny}.
I hope that you’ve enjoyed this blog post. If you have any more questions, feel free to reach out to me in the comments. Or you can contact me on Twitter or Mastodon. See you next time!
This in-depth video course teaches you everything you need to know about becoming better & more efficient at cleaning up messy data. This includes Excel & JSON files, text data and working with times & dates. If you want to get better at data cleaning, check out the course page.
Insightful Data Visualizations for "Uncreative" R Users
This video course teaches you how to leverage {ggplot2} to make charts that communicate effectively without being a design expert. Course information can be found on the course page.