# Compute some generic summary to displayed in a text
mean_price <- mean(modeldata::ames$Sale_Price)

# No formatting with glue()
glue::glue('The mean sale price is {mean_price}')
## The mean sale price is 180796.060068259

# Use built-in formatting option with `.dollar`
epoxy::epoxy('The mean sale price is {.dollar mean_price}')
## The mean sale price is $180,796Style your code output with {epoxy}
The new
epoxy package makes it dead-simple to format text outputs. In this blog post, I show you how that works.
One of the talks from Posit::conf that just blew me away was Garrick Aden-Buie’s talk on the {epoxy} package. It’s a great tool for creating formatted texts. You can think of it as glue() but more powerful. glue() on steroids if you will. In this blog post, I show you how that works. Alternatively, you can also watch the video version of this blog post.
Comparison with {glue}
In {epoxy}, you can use a glue()-like syntax but {epoxy} comes with much more formatting features compared to glue(). Here’s an example of that:
Combine multiple formatting instructions
You can also throw together multiple formatting instructions to make your texts pretty.
epoxy::epoxy('The mean sale price is {.bold .dollar mean_price}')
## The mean sale price is **$180,796**
But watch out here. The formatting order can be important.
epoxy::epoxy('The mean sale price is {.dollar .bold mean_price}')
## Error in `.transformer()`:
## ! Could not transform the text "**180796.060068259**" using `.dollar`.
## Caused by error in `x * scale`:
## ! non-numeric argument to binary operator
Render text instead of Markdown
As you can see, the output of the previous code is Markdown. If you want to render that into your document, you can use, say, epoxy_html() to do just that. Just watch out, that you will have to use double brackets in this case.
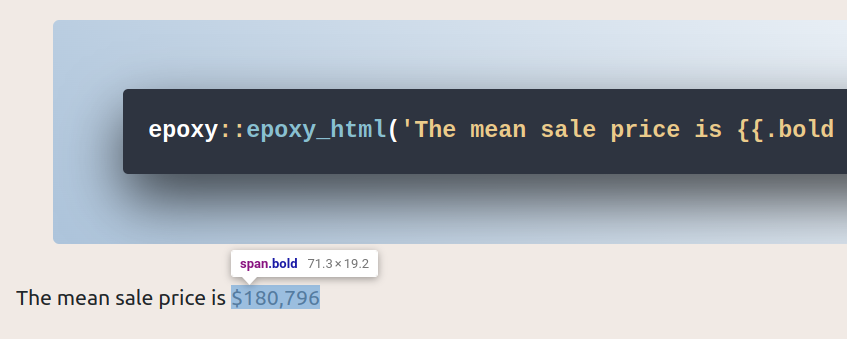
epoxy::epoxy_html('The mean sale price is {{.bold .dollar mean_price}}')
The mean sale price is $180,796
Have a look. Something is wrong here. Why is the text not bold in the output? Well, if you look at the html source code, you will see that the output is an inline span-tag with class bold.
To avoid that we have to actually use @ instead of ..
epoxy::epoxy_html('The mean sale price is {{@bold @dollar mean_price}}')
The mean sale price is $180,796
So why was the dollar sign rendered properly? It seems that in HTML output, {epoxy} just converts the first instruction to a CSS class. Hence, if we want to assign multiple classes we have to piece them together without empty spaces.
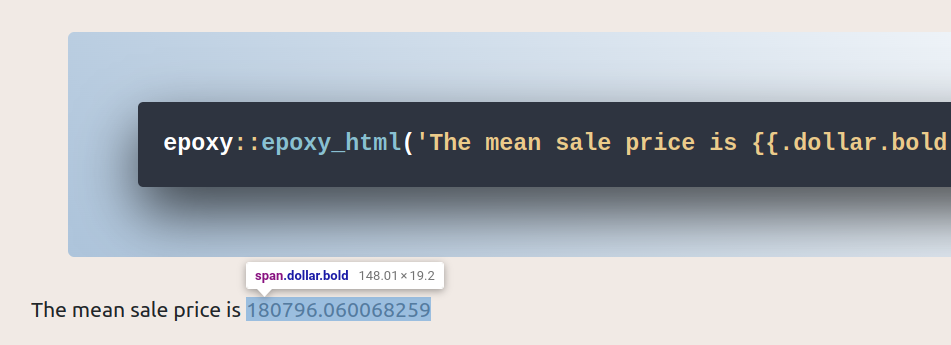
epoxy::epoxy_html('The mean sale price is {{.dollar.bold mean_price}}')
The mean sale price is 180796.060068259
Then, you will see that the text is not formatted at all but the span-tag has all the classes
Now without delving too much into HTML & CSS, let me just mention that this is an amazing tool to apply website-wide styling. Just add CSS classes to your outputs and style all of them with a single CSS-file.
Write whole chunks
The cool thing that makes {epoxy} so great for reports is that you can use whole chunks of text and include specific data-driven values inside of that. Let’s define some new numbers that we can use in that text.
divider_number <- 12
random_number <- rpois(n = 1, lambda = 54)
And then, we add an {epoxy} chunk.
  ```{epoxy}
  Here's more text.
  You can include the value from before, i.e. {.bold .dollar mean_price}.
  You can even do some calculation and divide your number by {.bold divider_number}.
  This will give you a value of {.bold .dollar mean_price / divider_number}.
  Not sure why it makes sense to compute such a number but hey this is just a short demo.
  So, bear with me here.
  Thank you for that, here's another number:  {.bold random_number}
  ```
Note that although I use this in a Quarto file to generate an HTML-file, I could use single-brackets. If I want to enforce the behavior of epoxy_html() (that can also add CSS classes), I will have to use an {epoxy_html} chunk. In any case, the rendered text looks like this:
Chunk Output
Here’s more text. You can include the value from before, i.e. $180,796. You can even do some calculation and divide your number by 12. This will give you a value of $15,066.34. Not sure why it makes sense to compute such a number but hey this is just a short demo. So, bear with me here. Thank you for that, here’s another number: 46
Avoid code repetition
If we wanted to avoid typing out .bold in our previous chunk, we could set the “transformer” of that chunk to make all inputs bold. This works by using epoxy_transform() to chain the “bold transformer” with the “inline transformer” that we have been using by default anyway.
  ```{epoxy, .transformer=epoxy::epoxy_transform('inline', 'bold')}
  Here's more text.
  You can include the value from before, i.e. {.dollar mean_price}.
  You can even do some calculation and divide your number by {divider_number}.
  This will give you a value of {.dollar mean_price / divider_number}.
  Not sure why it makes sense to compute such a number but hey this is just a short demo.
  So, bear with me here.
  Thank you for that, here's another number:  {random_number}
  ```
Chunk Output
Here’s more text. You can include the value from before, i.e. $180,796. You can even do some calculation and divide your number by 12. This will give you a value of $15,066.34. Not sure why it makes sense to compute such a number but hey this is just a short demo. So, bear with me here. Thank you for that, here’s another number: 46
This transformer thing is a bit of a hard concept to wrap your head around. So don’t fuss about it if you don’t get it immediately. It took me a bit to figure it out too.
It’s not all about the numbers
Interestingly, {epoxy} doesn’t do only numbers. You can also transform texts.
bad_title <- "the INPUT was MESSED UP"
epoxy::epoxy(
  'This is a formatted title: {.titlecase .lowercase bad_title}'
)
## This is a formatted title: The Input Was Messed Up
Here, I formatted the text by making everything into lower case and then applying title case. Pretty easy to do that by combining the formatting keywords.
Work with more than single outputs
What I find even more fascinating is that {epoxy} can actually handle more than a single input. Here’s a simple example from the docs:
epoxy::epoxy(
  '{1:4}. "{letters[1:4]}" is for {c("apple", "banana", "coconut", "donut")}'
)
## 1. "a" is for apple
## 2. "b" is for banana
## 3. "c" is for coconut
## 4. "d" is for donut
Right now, this gives you four lines of output. But you can actually determine how to collapse these into a single line. This works with keywords like .and, .or as well as .comma. Judging from the next output, I think you can guess what each of those keywords does.
epoxy::epoxy(
  '{1:4}. "{.and letters[1:4]}" is for {c("apple", "banana", "coconut", "donut")}'
)
## 1. "a, b, c, and d" is for apple
## 2. "a, b, c, and d" is for banana
## 3. "a, b, c, and d" is for coconut
## 4. "a, b, c, and d" is for donut
Well, that worked wonderfully. But it doesn’t make that much sense here, does it? Oh well, I think in a demo like this, that’s okay. 😆
Use {epoxy} with Shiny
Remember how epoxy_html() used { } to create HTML output? You can use that in Shiny apps too. Here’s an example code chunk.
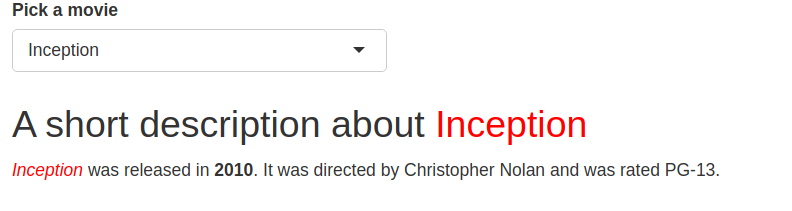
ui_epoxy_html(
  .id = "movie_info",
  h2('A short description about {{ title }}'),
  p(
    "{{ em title }} was released",
    "in {{ strong year }}.",
    "It was directed by {{ director }}",
    "and was rated {{ rated }}."
  )
)
Here, the placeholders title, year, director and rated have to be filled using a render_epoxy() call. Notice that we can also add HTML markup. So instead of using @bold to make the output bold, we have to use strong because that means the output will be wrapped in <strong></strong> tags. Now, to render the output, use render_epoxy() that provides a list (in this case a tibble) of values for the placeholders.
output$movie_info <- render_epoxy(.list = movie())Here, movie() is a reactive expression containing a tibble with column names matching the placeholders. This reactive expression can be linked to a dropdown input so that you get a dynamic UI like this:

The code for the full app can be found in this folded code chunk:
Shiny app
library(shiny)
library(epoxy)

movie_choices <- bechdel$imdb_id
names(movie_choices) <- bechdel$title

ui <- fixedPage(
  div(
    selectInput("movie", "Pick a movie", choices = movie_choices),
    style = 'margin-top:20px;'
  ),
  ui_epoxy_html(
    .id = "movie_info",
    h2('A short description about {{ title }}'),
    p(
      "{{ em title }} was released",
      "in {{ strong year }}.",
      "It was directed by {{ director }}",
      "and was rated {{ rated }}."
    )
  )
)

server <- function(input, output, session) {
  movie <- reactive({
    # Use the inputs to filter a single row
    bechdel[bechdel$imdb_id == input$movie, ]
  })

  # Pass the reactive data frame to
  # the .list argument of render_epoxy()
  output$movie_info <- render_epoxy(.list = movie())
}

shinyApp(ui, server)
Of course, you can wrap not only stuff like p(), h2(), etc. into ui_epoxy_html(). You can also use arbitrary inputs like sliderInput().
Use Markdown for long texts
Finally, let me mention that writing long texts with ui_epoxy_html() may be tedious. Instead, you can use ui_epoxy_markdown() to write everything based on Markdown. For example, you could transform our previous UI as follows:
ui_epoxy_markdown(
    .id = "movie_info",
"
## A short description about {{ title }}

{{ em title }} was released in {{ strong year }}.
It was directed by {{ director }} and was rated {{ rated }}.
"
)
But of course, this might me messy. To make it a bit easier on your UI code, put that Markdown stuff into a new Markdown file and load it with includeMarkdown().
ui_epoxy_markdown(
  .id = "movie_info",
  includeMarkdown('UI_text.md')
)
And just like we mentioned before: If you need to add more styling than what Markdown can give you, then you can throw in custom CSS classes that you can style individually. For example, you could modify your Markdown file to include a class .red_class to the title.
## A short description about {{.red_class title }}

{{ em.red_class title }} was released in {{ strong year }}.
It was directed by {{ director }} and was rated {{ rated }}.
And in your app, you could include the style with a seperate CSS file. But for a demo case like this, you can just add it inline.
tags$style('.red_class {color: red;}')If you put everything together, you will get an app like this:
So that should give you an impression of how you can combine {epoxy} and {shiny} to make your life easier. The full app can be found in this folded code chunk:
Shiny app
library(shiny)
library(epoxy)

movie_choices <- bechdel$imdb_id
names(movie_choices) <- bechdel$title

ui <- fixedPage(
  tags$style('.red_class {color: red;}'),
  selectInput("movie", "Pick a movie", choices = movie_choices),
  ui_epoxy_markdown(
    .id = "movie_info",
    includeMarkdown('UI_text.md')
  )
)

server <- function(input, output, session) {
  movie <- reactive({
    # Use the inputs to filter a single row
    bechdel[bechdel$imdb_id == input$movie, ]
  })

  # Pass the reactive data frame to
  # the .list argument of render_epoxy()
  output$movie_info <- render_epoxy(.list = movie())
}

shinyApp(ui, server)
Check out the other instructive examples that run_epoxy_example_app() can show you. The cool thing about this is that you will get to see the Shiny code as well as the app next to each other.
Conclusion
Hope you enjoyed this blog post. And as always, if you have any questions feel free to reach out to me via the comments below or via LinkedIn


