WebDev4R: Meet the Web Inspector
The web inspector of your web browser lets you take a look at the source code of any website that you want. And getting comfortable with it is a great way to learn how to write HTML and CSS. More importantly, whenever you write your own HTML & CSS code, chances are that something will go wrong. The web inspector is a premier tool to see what’s going on. So let’s dive into the blog post. Or if you enjoy video content more, you can watch the corresponding video on my YouTube channel:
Opening the web inspector
The web inspector is available in all modern web browsers. And opening couldn’t be easier. All you have to do is right-click on any element of a website and select “Inspect” from the context menu that pops up. If you know the keyboard shortcuts you don’t even need to click on inspect. You can just press N (in Chrome) or Q (in Firefox) to open the web inspector. And the best part is if you do that repeatedly, the web inspector will navigate you to the source code of the specific part you right-clicked on.
Let’s put this to a test. We can head over to, say, one of my newsletters.

This particular newsletter edition is the start of a series where I build a dashboard that looks like a weather app with R. (Yet another use case for WebDev knowledge for R projects) If you’re curious about that series or the newsletter, you can join the newsletter here.
Anyway, let’s open the web inspector. I’m using Chrome, so I’ll right-click on the headline and select “Inspect”. This will open the web inspector and there’s a WHOLE LOT GOING ON. Don’t be alarmed by this. Focus on the one part that is highlighted, namely the code of the headline indicated by the <h1> tag.
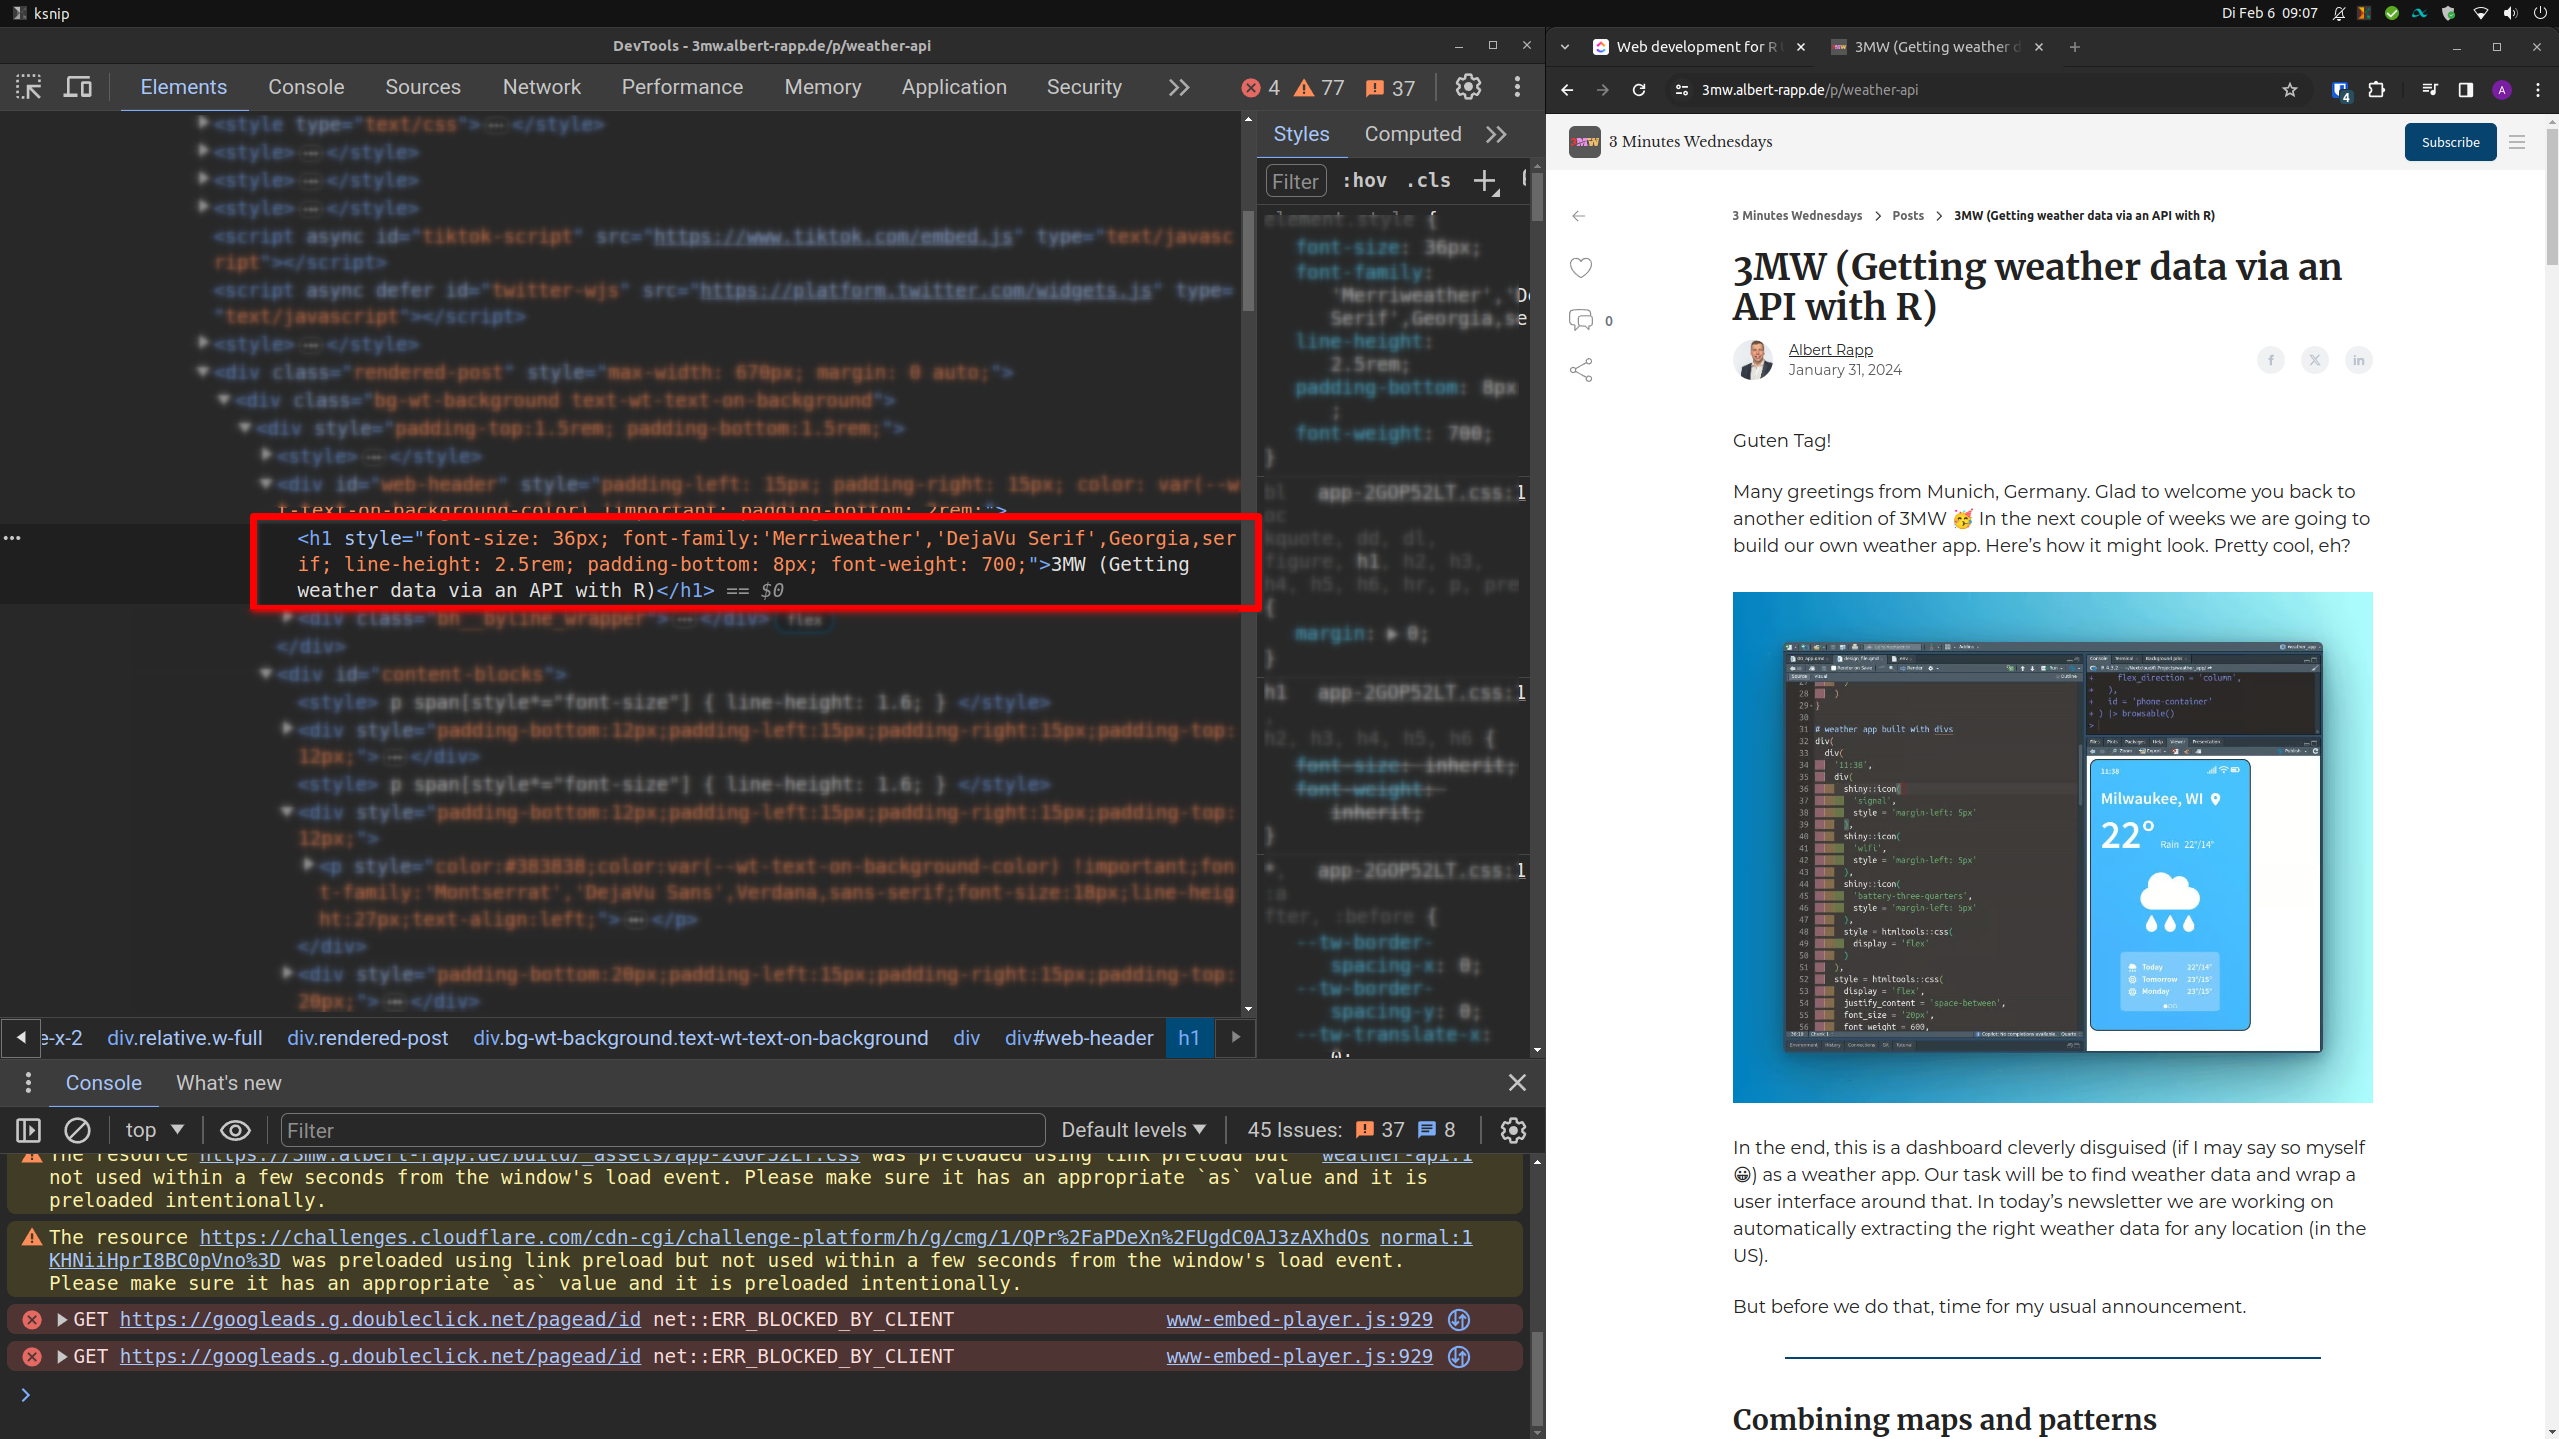
Everything is a rectangle
From this view, we can learn a whole lot about what HTML & CSS is about. And one thing you can see immediately is that everything is a rectangle. Try navigating your cursor over different parts of the code and you’ll see on the website itself rectangles get highlighted.
That’s fundamentally what HTML is about: A whole lot of different rectangles/containers nested into each other. You see, HTML is really just this structure of rectangles. And CSS is the tool to style these rectangles so that everything looks pretty.
The structure
And we can learn more about the structure of the website from the web inspector. Scroll all the way to the top of the source code and toggle the tag that says <body>. Then you should get something like this:
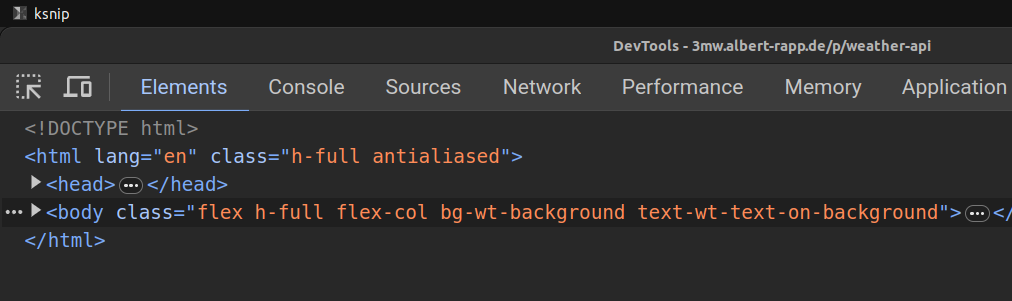
Body and Head
This is the structure of the website. Really, it means that any website is a <html> tag that contains a <head> and a <body> tag. Inside of the <head> tag lives the metadata of the website and all the prerequisites for the website to work. You can think of this part as the library() calls that you make in R, i.e. the calls you make to load the packages you need for your R code to work. Same thing happens with a website.
Inside of the <body> tag lives the actual content of the website. And inside of this tag, the first thing you will find is a <div> tag. That’s one of the most fundamental building blocks in HTML. But don’t think about this too much. At the end it’s just another rectangle/container that is used to store other rectangles.
(Inline) Styles
Once again, that’s the philosophy of HTML: Bunch of tags nested into one another. But there’s more to it. Every tag can have a style. And that’s where CSS comes into play.
Take this <div> tag for example (I’ve taken this from the source code of the newsletter but don’t worry if you don’t immediately see it. It’s just for illustration):
<div style="position:fixed;z-index:9999;top:16px;left:16px;right:16px;bottom:16px;pointer-events:none"></div>If this is a whole lot of gibberish to you, don’t worry. It’s just a bunch of CSS properties (seperated by ;) that are applied to this particular <div> tag. At it’s core this is what CSS is about: Applying styles to tags using keywords like position or z-index and setting them to specific values like fixed or 9999.
We’ll learn more about these keywords in the next blog post. Right now we’re only interested in the structure of the source code. Suffice to say that these key words change the appearance of this particular <div> element on the website. And don’t be fooled by the appearance of the <div> tag here. This works for any tag.
CSS Classes
Now look at another element I’ve extracted from my newsletter:
<div class="bg-wt-background text-wt-text-on-background"></div>This is a <div> tag as well but this time it uses the two classes bg-wt-background and text-wt-text-on-background instead of a style attribute. As you can probably guess from the names, these classes are used to apply a specific background color and text color to this particular <div> tag. But the beauty of this approach is that these classes can be reused on any tag. Thus, you will often find that the same class is used on multiple tags throughout the source code. It’s just a clever way to avoid code-duplication.
So how do we find out what these classes do? Well, it’s displayed in your web inspector in the style panel.
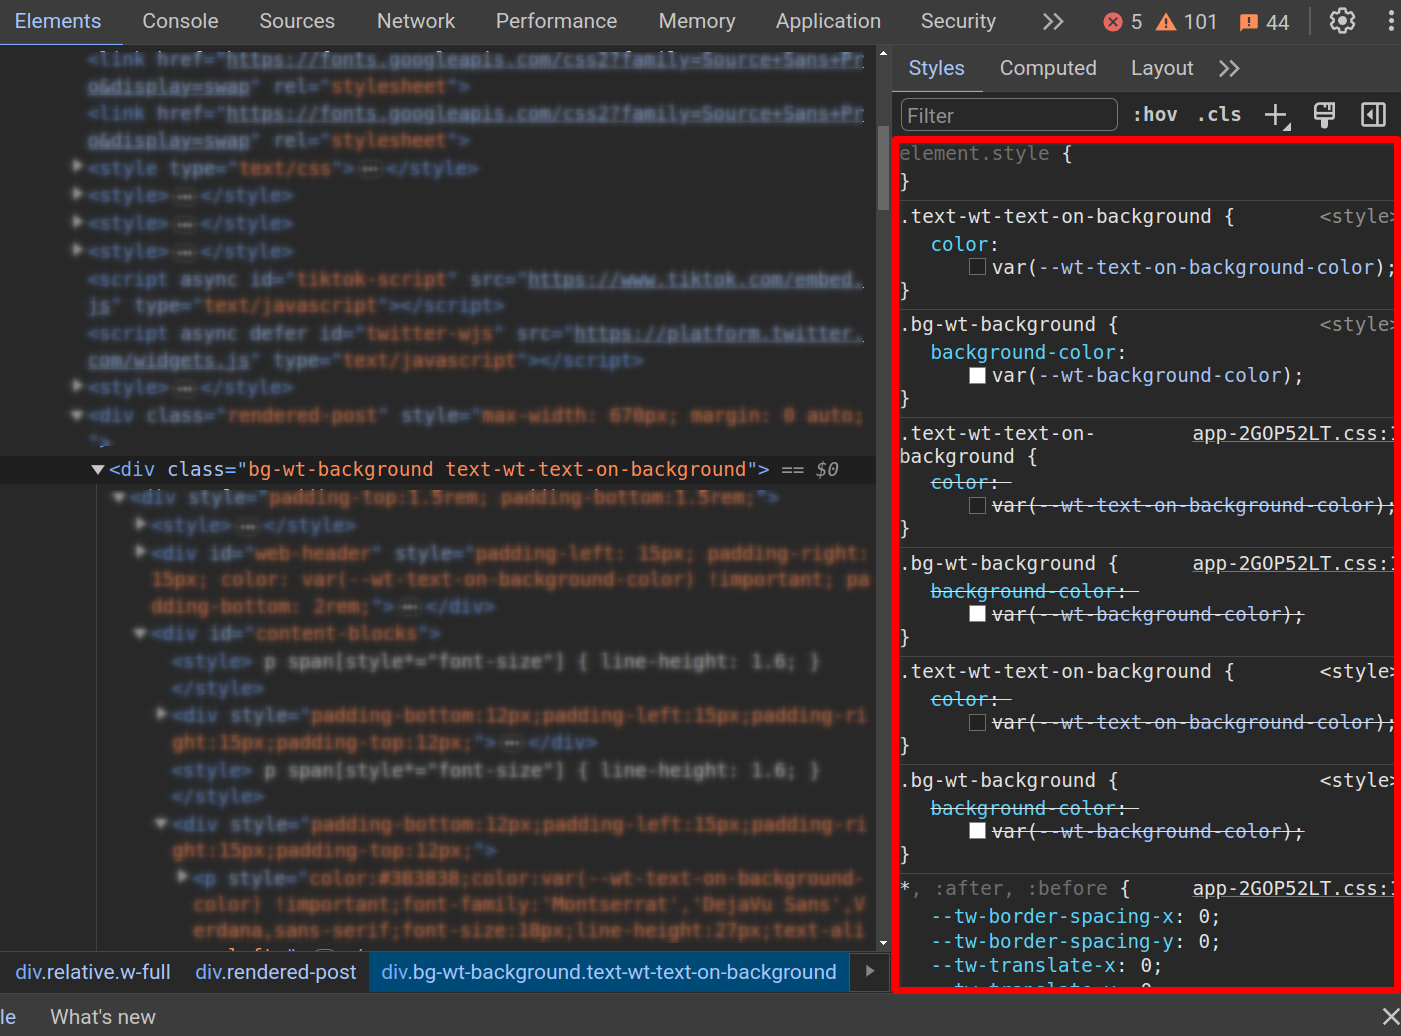
Notice that the web inspector shows you something like this at the top:
.bg-wt-background {
    background-color: var(--wt-background-color);
}
.text-wt-text-on-background {
    color: var(--wt-text-on-background-color);
}
This is the CSS code that is applied to these classes. And you can see that it’s just a bunch of key value pairs. In this case, the color is set to a variable using the var() function (the CSS syntax can feel a bit arcane sometimes).
More importantly, notice the . in front of the class names. This one is crucial. This symbol is used to indicate that this is a CSS class. Keep that in mind. That’s how you determine what’s a class and how you can define your own classes (which we’ll do in another blog post).
Specificity is everything
Notice in the previous screenshot that there are a whole lot of styles stacked on top of each other in the “Styles” pane. That’s because the web inspector shows you all the styles that are applied to this particular element. But only the most specific style is actually applied. What does that mean?
Well, let’s say you have a class that sets the color of a text to red. And you have another class that sets the color of a text to blue. And you use these classes in a code chunk like this:
<div class="red-text">
  <p class="blue-text">This is a paragraph</p>
</div>
Assuming the classes change the text color, the text that one would see if one were to render this HTML coe will be blue because the .blue-text class is more specific than the .red-text class. But if that .red-text class would also make the text bold and the .blue-text class makes the text only blue and not bold, then the text would be bold and blue. That’s because there is only a conflict for the text color, so the more specific style is applied.
That’s why it’s helpful when the web inspector shows you the stack of styles. That way, you can see which style is actually applied and which one is not.
IDs
Finally, let me mention that there’s also something called an ID. That’s a way to make a tag even more specific. For example, take a look at this code. It defines an ID for the paragraph.
<div class="red-text">
  <p class="blue-text" id="some-ID">This is a paragraph</p>
</div>
If you want to apply a style to this paragraph and only this paragraph, you can use the # symbol to indicate that this is an ID and apply a style to it. For example, here’s what this could look like:
#some-ID {
  color: green;
}
In this case, the paragraph would be green regardless of what color the classes red-text and blue-text specify. This happens because the ID is more specific than the class.
Conclusion
Alright, with that we have covered how to use the web inspector to look at the source code of a website. And more importantly we have started to understand the basics of HTML and CSS. To bring it all together, here’s a quick summary:
- HTML is a bunch of rectangles nested into each other. All of this happens via tags like
<div>,<h1>,<p>, … - CSS is the tool to style these rectangles. You can do this by applying styles to tags using keywords like
positionorz-indexand setting them to specific values likefixedor9999. Sometimes you do that with the inlinestyleargument for tags but more often than not you use classes and IDs to apply styles to tags. - CSS classes and IDs are just a collection of different keywords and values. They are defined with a
.or#in front of the name and can be reused on any tag. - If CSS instructions clash, then the most specific one is applied.
If you found this helpful, here are some other ways I can help you:
- 3 Minute Wednesdays: A weekly newsletter with bite-sized tips and tricks for R users
- Insightful Data Visualizations for “Uncreative” R Users: A course that teaches you how to leverage
{ggplot2}to make charts that communicate effectively without being a design expert.


