We cannot always rely on writing the CSS code from scratch. Sometimes, we need to select elements from the existing source code and apply styles to them. I’ll show you how to do this with CSS selection.
Author
Albert Rapp
Published
March 14, 2024
A lot of our favorite R tools generate HTML & CSS code for us. For example, any {gt} table is really just a bunch of HTML & CSS code. Don’t believe me? Here’s a basic {gt} table. Use the web inspector to see the HTML & CSS code behind it.
Lucky for us this also proves to be a perfect playground for testing how to modify existing HTML & CSS code. You see, we cannot always rely on writing the CSS code from scratch. Sometimes, we need to select elements from the existing source code and apply styles to them. So that’s what we’ll do in this blog post. And as always if you enjoy video content more, you can watch the corresponding video on my YouTube channel:
CSS Diner
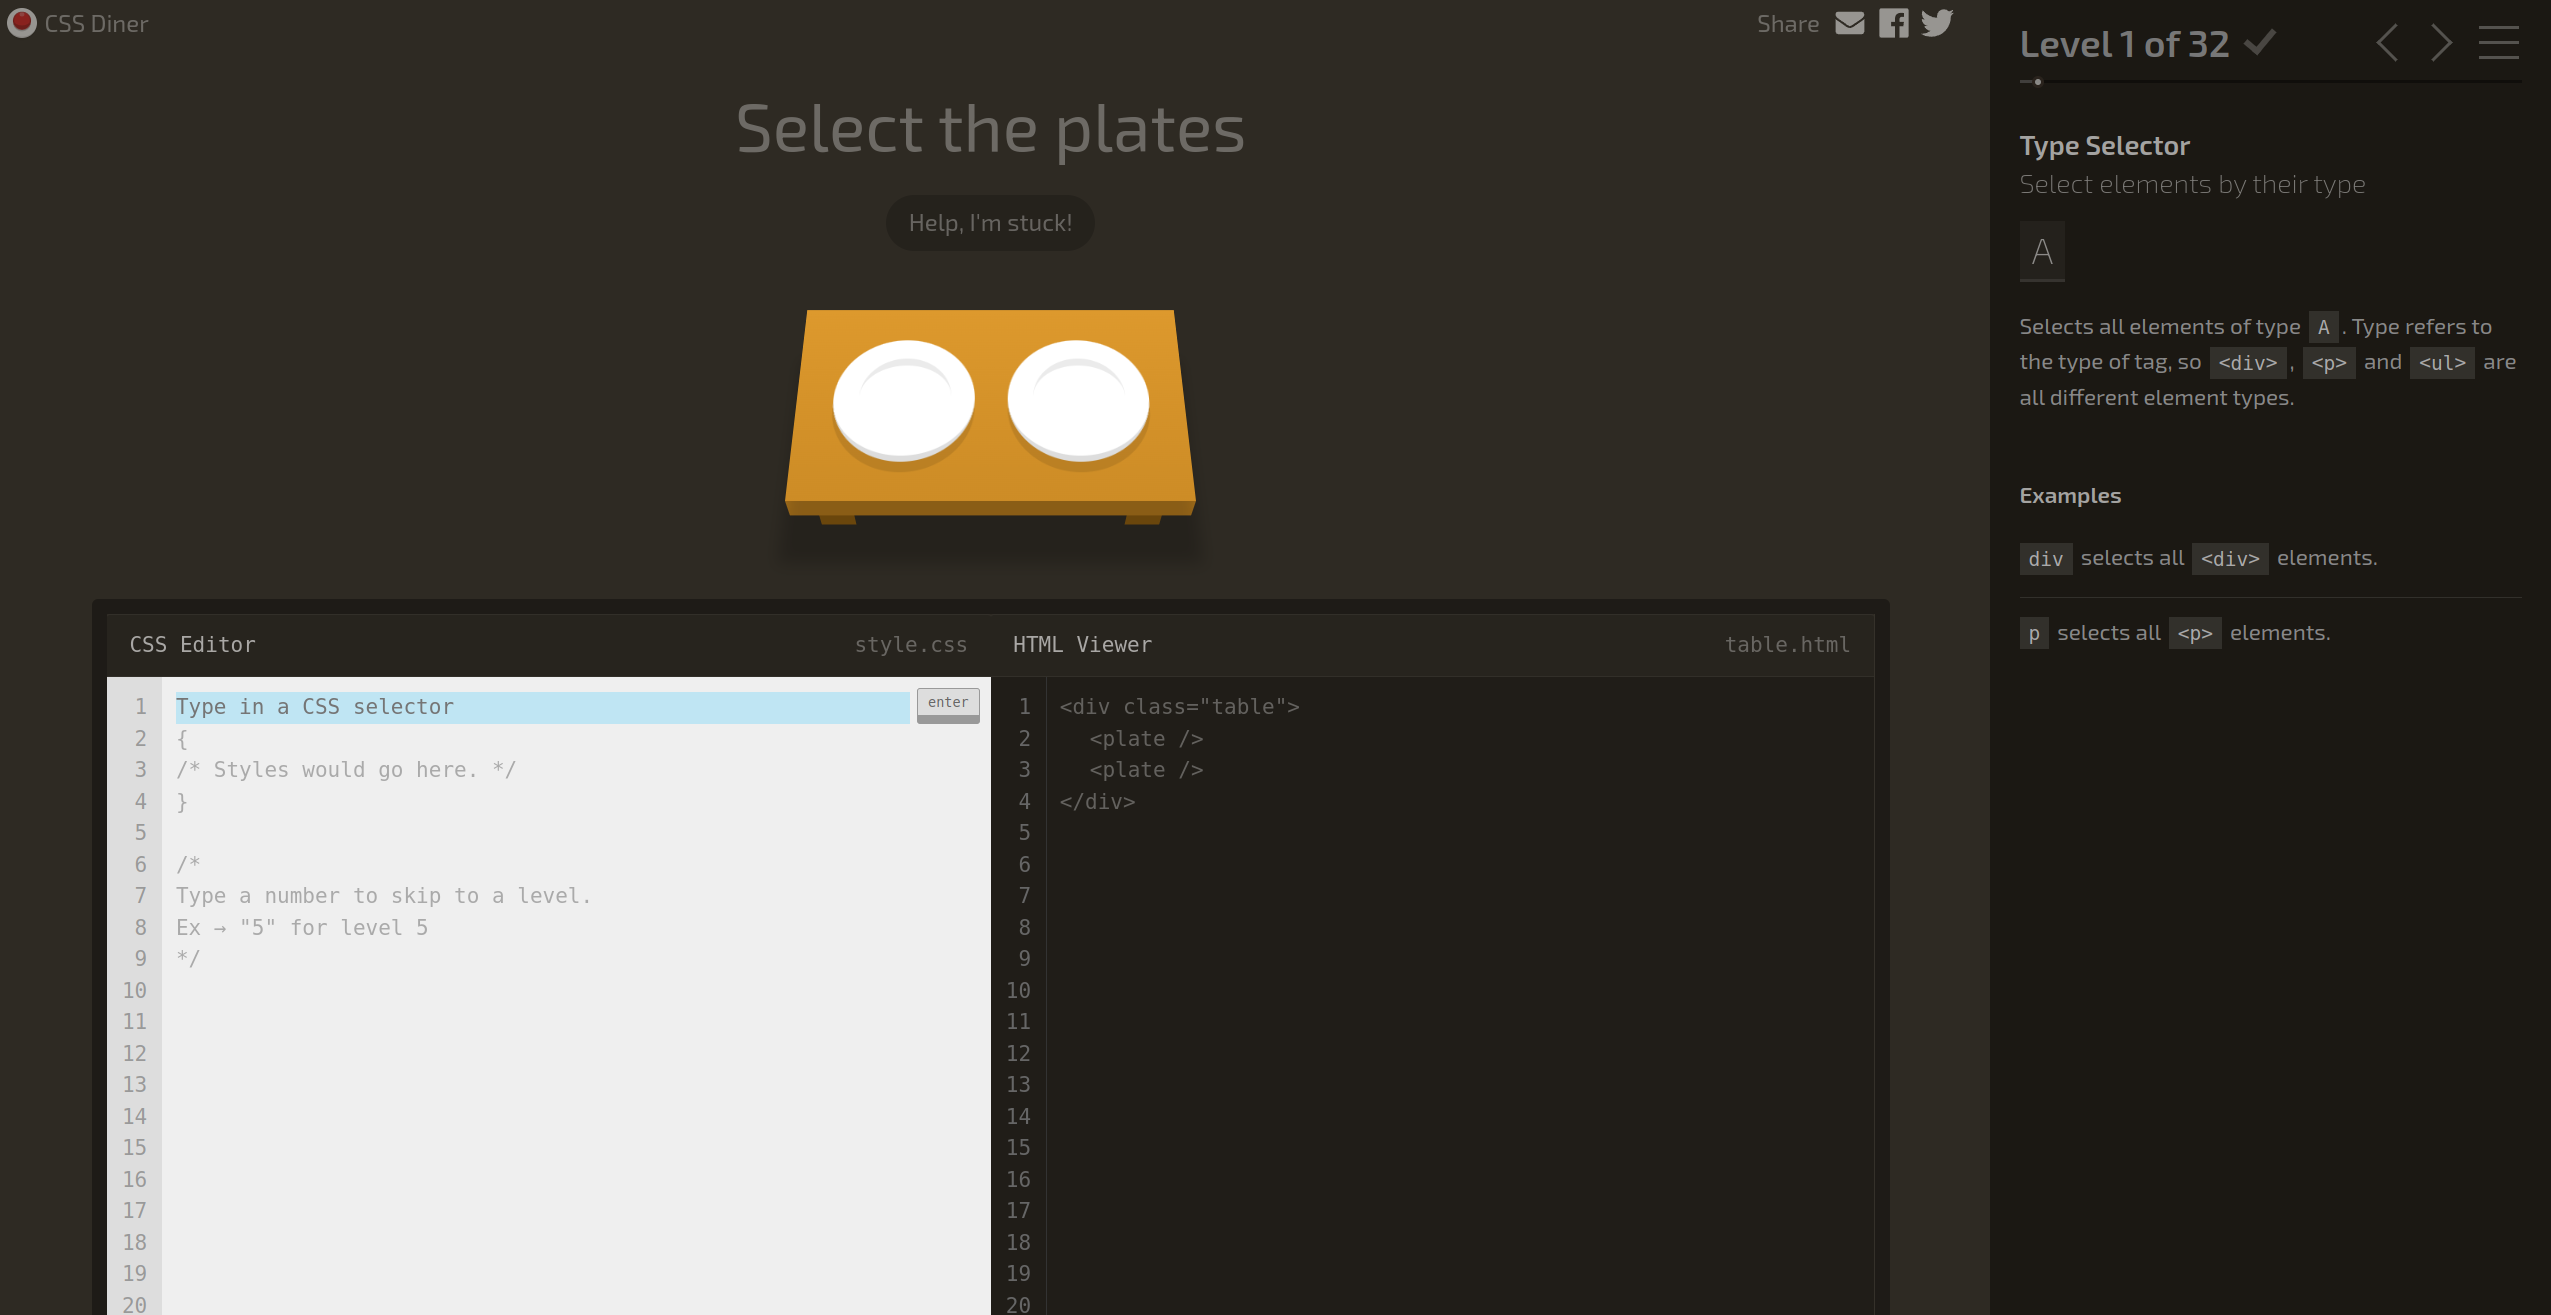
Before we work on our specific use case, let’s first get a good understanding of how CSS selection works. To do so, I recommend you play the game CSS Diner. In fact, I’ll give you a walkthrough of the first few levels of the game. This is a great way to learn how to select elements in CSS. Here’s how the first level looks:
As you can see at the top there’s always a table and an instruction what elements you are to select from the table. Below the table, you have an editor. The left half of that editor is where you can put in CSS code and the right half shows you the “source code” of the table. Your task is to infer the correct CSS code to select the desired elements.
The one thing you need to know to play this game is how to actually select elements in CSS. It’s actually quite simple. Here’s a small CSS code snippet
p.class1 {color:red;}
This CSS code selects all <p> tags with the class class1 and makes their text red. In this case, p.class1 is the selector. It consists of p (the tag) and .class1 (the class indicated by .). In the CSS diner game, you learn a whole range of other ways to select elements. You won’t have to specify any styles like color:red;. The selector is enough.
And if you ever need more information, then the right-hand side of the game window shows you useful examples and techniques to get more familiar with CSS selection.
Level 1: Select tags of certain type
In the first level, you are asked to select all plates. Here’s the source code. This code uses special tags that are not part of HTML. They are just used in the game to make it more fun. In reality, you would use normal HTML tags like <div>, <p>, <table>, etc. Anyway, you can check the solution once you’ve figured out a selector.
Combine the tag with the # to target plate tags with the id fancy.
plate#fancy { # style instructions here}
Level 4: Select an element inside another element
Here’s another example. This time you need to select the the apple on the plate. Notice how the apple is nested inside the plate. That’s why we use the opening and closing tags <plate> and </plate> instead of just <plate />.
Get descendants by listing the tags with spaces in between. Notice that you need to add the ID too. Otherwise you would select all pickles on all plates.
plate#fancy pickle { # style instructions here}
Level 6: Select an element by class
Here’s another example. This time you need to select the small apples
Get classed elements via the . symbol. Make sure to not use a white space after the apple tag. Otherwise you would select all elements with a small class that are inside an apple.
apple.small { # style instructions here}
Level 7: Select an element by class
Here’s another example. This time you need to select the small oranges.
Use the same style instructions for multiple selections by combining everything with ,
plate, bento { # style instructions here}
Level 10: Select multiple elements with different selectors
Okay, Level 10 is the last one we’re going to play together. This gives you most of the tools you need for the next R example. But I still encourage you the play the game all the way until the end. Anyway, this time you need to select all the things.
Alright, now let’s do something closer to R. Let’s take a look at the source code of the {gt} table from before You can get it by using
gt_tbl |>as_raw_html(inline_css =FALSE)
This will give you give a long output including all the CSS code for all the classes that the {gt} table uses. Here, I have manually cleaned up the output to give us only the structure of the table and the classes that are used.
As you can see, the table is nothing but a <table> tag consisting of a <thead> and a <tbody> tag. These tags are then filled with <tr> and <td> tags. All of this is stuck into a <div> tag with the id test-table. Finally, the <div> also contains <style> tag that contains all the CSS code for the table. Here, I have removed all but the first CSS instruction for legibility. These CSS instructions are still used of course, I just didn’t print them in this overview.
We can insert our own CSS code into the table’s CSS code via the opt_css() layer of the {gt} package.
gt_tbl |>opt_css(css ="INSERT CSS HERE")
Normally, we could also attach a CSS file to to this Quarto document in order to define new styles for our table. But for the sake of practicing, let’s just add small snippets of CSS code via opt_css().
Make the table header red
Let’s start to make the text in the column names red. Judging from the code above, we might be able to select the <tr> tag that has the gt_col_headings class. At least it looks like all column names are nested inside of that. So let’s try that.
Hmm this didn’t work. What did go wrong? Notice that inside <style> tag the styles were set by #test-table .gt_caption. This means that the styles are only applied to elements that are inside the #test-table div. That’s pretty specific (since it uses a named element.)
So maybe we should try to be more specific with our selector. Let’s add the name of the table to our selector.
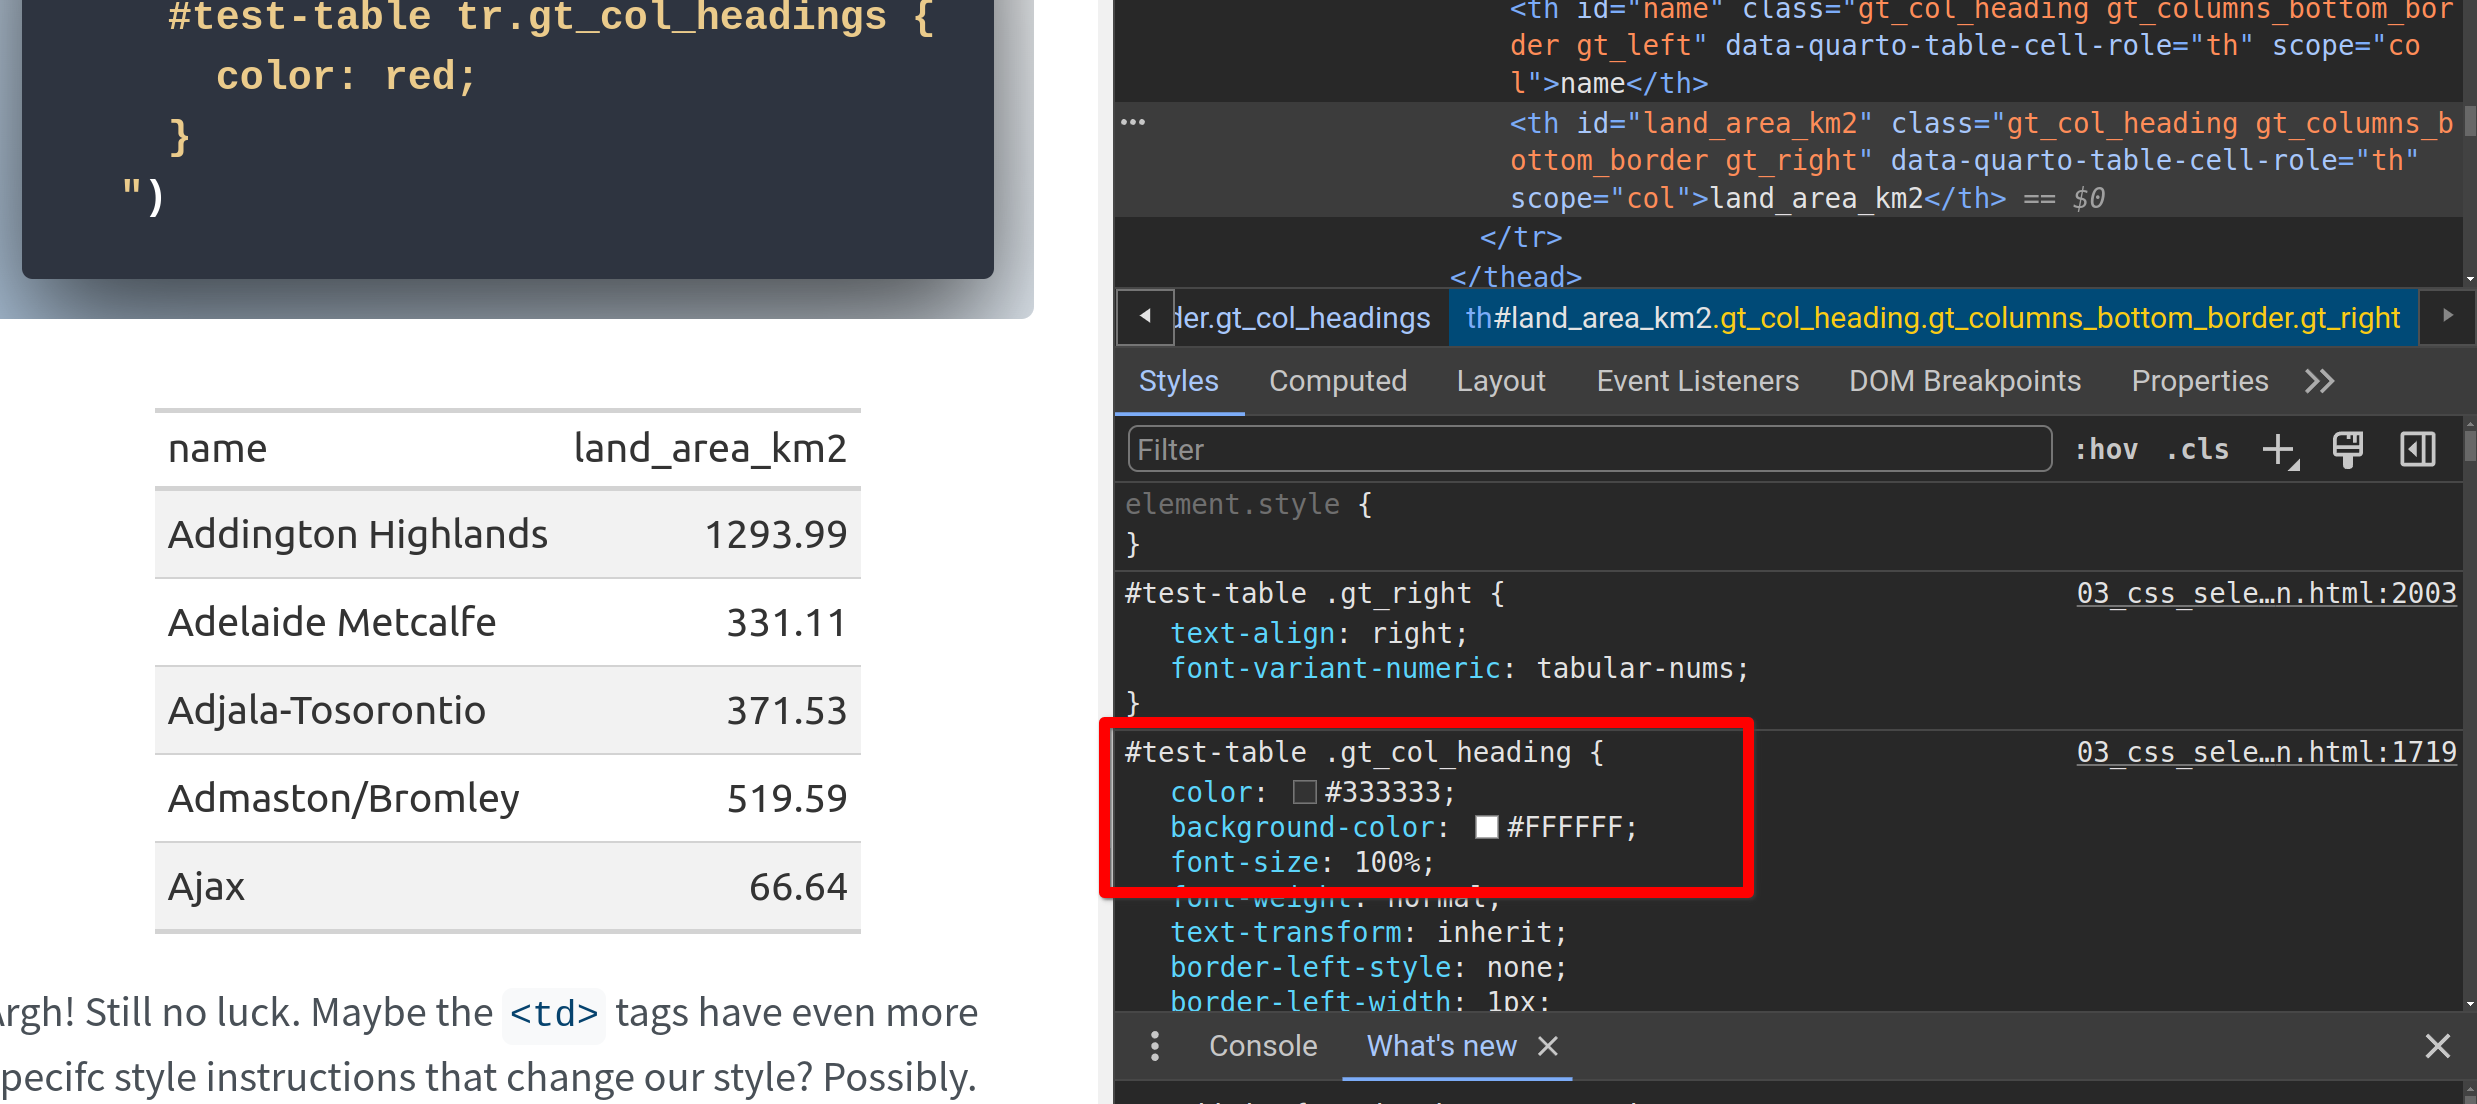
Argh! Still no luck. Maybe the <td> tags have even more specifc style instructions that change our style? Possibly. But I’ve have enough of the guessing game. Let’s actually find out what’s going on with our almighty web inspector.
And if we select the first <td> tag, the style panel inside the web inspector actually has quite a story to tell: The most specific instruction that species the color of the text is #test-table .gt_col_heading.
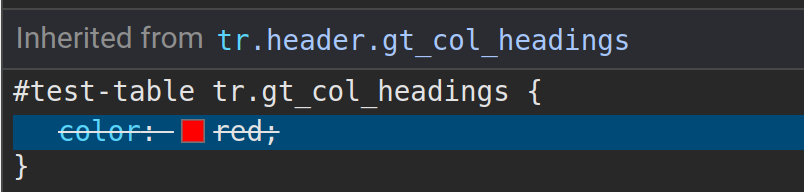
And our selector #test-table tr.gt_col_headings is not specific enough to override that. Actually, if you scroll down the list of style instructions, you will find our style instructions close to the bottom. And it’s crossed out.
So armed with that knowledge, we can now make our selector more specific. Here, I demonstrate that by creating the same table with a different id and then using the new id in the selector. You see, otherwise the new style would apply to the previous tables in this blog post too. And that would be confusing for you, my fabulous reader.
Use n-th child to make selected cell blue with white text
Now let’s do one more fancy thing. I want to motivate playing the CSS Diner game all the way until the end. It will teach you things like :nth-child and much more. With these tools, you can get reaaaally specific. Like targeting only the second column of the third row of the table. Sure you can do that with in-build functions from {gt} too. But that’s not much of a CSS learning experience, is it?
This in-depth video course teaches you everything you need to know about becoming better & more efficient at cleaning up messy data. This includes Excel & JSON files, text data and working with times & dates. If you want to get better at data cleaning, check out the course page.
Insightful Data Visualizations for "Uncreative" R Users
This video course teaches you how to leverage {ggplot2} to make charts that communicate effectively without being a design expert. Course information can be found on the course page.